

Posted by BL Blink Lashes on 4th Nov 2020
Ways to Improve Your Lash Extension Isolation Skills
Ways to Improve Your Lash Extension Isolation Skills
No lash technician wants to become infamous for a botched job, especially such a rookie mistake as lash stickies. Not only are stuck-together lashes unattractive, they can also cause long-term damage to your client’s natural lashes. Proper isolation technique is essential. The lashes are more comfortable to wear, and the overall design is not an eye sore (both literally and figuratively!).

Why is proper isolation technique important?
Prevent dreaded lash stickies
Our natural lashes, like everything else, go through a lifecycle. They grow and fall out and grow and fall out, and each one does so in its own rhythm. One lash may just be sprouting, while the one next to it is ready to fall out to let another one come through.
When you don’t isolate properly while attaching extensions, the lashes tend to stick together, creating what we call lash stickies.
When this happens, a lash that is about to fall out might pull on one that is just starting out, which will cause damage to the follicle. Over time, this can create long-term damage to the natural lashes, and possibly even bald spots.
Lash stickies can cause a mass lash fall out like this:

Read: The 7 worst things a lash technician can do
Now, imagine a whole bunch of lashes clumped together. They weren’t isolated properly and now they’re causing all sorts of discomfort to your client.
Not only are they heavy, but they’re also uncomfortable as stronger lashes put pressure on weaker ones. They might even cause issues with vision as a clump may be visible in front of your client’s eye, distracting them. With good isolation, this becomes a non-issue.
Isolate your way to a stunning design
Because each individual lash is in a different stage of growth, it’s also a different size. If you were to neglect proper isolation, then you could mess up the entire design.

Our lashes aren’t perfect and uniform, so separating each one for extension application means that you can choose the right size and shape of extension lash for each natural lash.
Push your skills to the next level
Of course, as you gain more experience as a lash artist, your skills will improve. If you take time at the beginning of your road to being a lash technician to work on your isolation technique, you will only get better and better with time.
With lash extensions, speed (and accuracy!) is key.
One day, you'll get there:

First focus only on clean isolation and right placement.
Then, use a timer to record and see how much time you spend on isolating both the left and right eye individually. Once you know what step in the process is holding you back, practice doing that more so that you can get faster at it.
You’ll get better and faster at it, shortening the application time, and, most importantly, be able to fit in more clients into your day.
Types of isolation techniques
Now let’s talk about some of the techniques you can use to isolate like a pro.
Double-handed isolation technique
The name is practically self-explanatory, but with the double-handed isolation technique you use both of your hands to isolate lashes.

In the beginning, if you are right-handed, you will find it difficult to use only your left hand for isolating the lashes. Feel free to use the right hand to assist the isolation until you feel comfortable to use just one hand.
Using a guide lash technique
If an itty bitty natural lash keeps getting tangled in your isolation (and on your nerve), use a guide lash to get it out of your way. Attach a 0.07mm thick extension on the natural lash. You’ll find isolation to be much easier because now you can see and set aside the tiny lash.
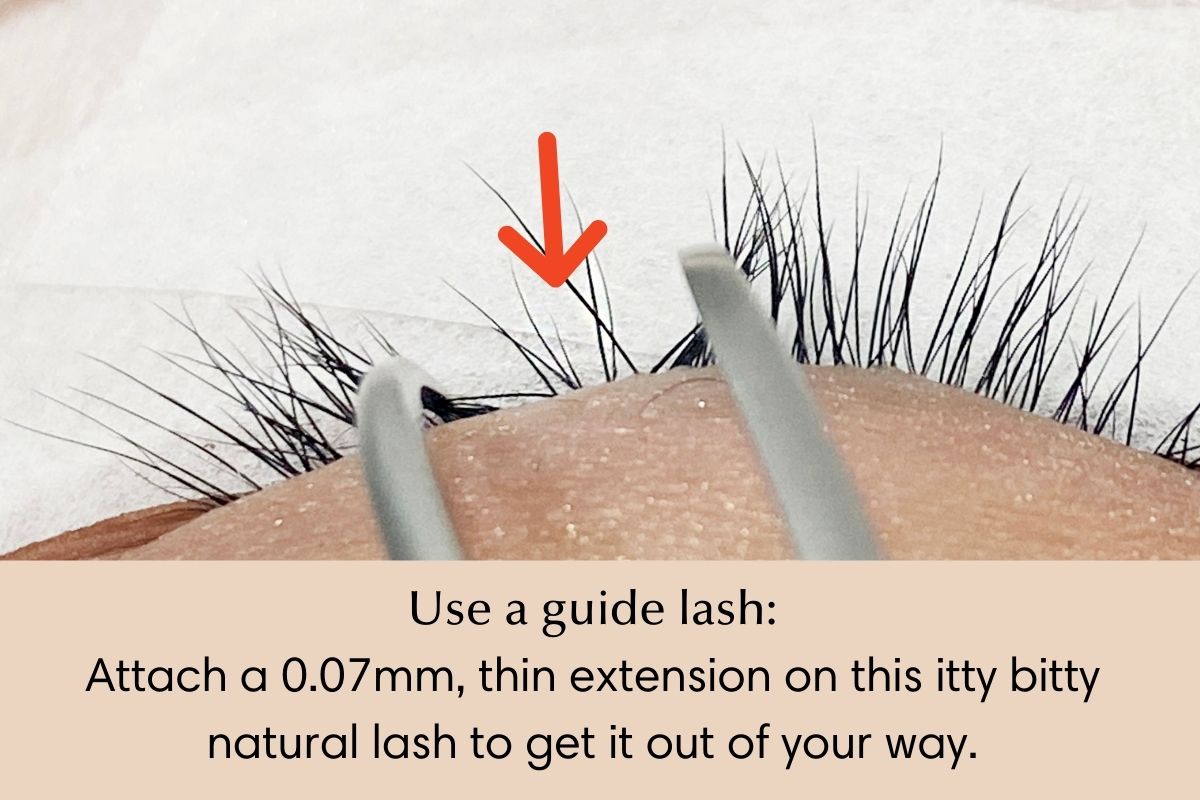
Since this natural lash is very thin and short, the attached extension won’t last long, but it will last through the application and help you to get through the procedure.
Working in layers technique
You may have heard the term “isolation by layer technique” floating around recently and wondered what it might mean.
Our natural lashes are composed of 2-3 vertical layers (up to 5 layers for someone with lots of hair).

If you find it difficult to isolate lashes horizontally, working your way through vertically first can be helpful. This technique is especially helpful when working with volume lash extensions. You can do this by separating one layer of lashes at a time with the help of taping.
How to isolate and apply lashes by layer:
- Prepare a strip of tape longer than the width of the client’s eye. Attach one more layer of tape facing towards the adhesive part so that the tape doesn’t pull on the lashes. Tape is used to hold the lashes, not to pull or attach.
 If your client has very short lashes, leave a bit of the adhesive exposed so that it can pull up the short lashes (like in the picture below).
- Hold up the lashes with the tape.

- Using tweezers, release one layer of natural lashes from the taped area.

- Apply lash extensions to the released natural lashes.

- Once you finish applying extensions to a layer, take out a new layer of lashes from the taped area.

- Repeat this until you have placed all of the extensions on all the layers of lashes.

Best isolation tweezers for lash extensions
Use a correct isolation tweezer: You need to make endless motions of delicate gripping/un-gripping during the lash isolation. It can tire your hand easily, and for that isolation tweezers should be lightweight and shouldn’t have too much tension on the grip. We recommend using SS-SA.

Anything that helps us be quicker and more efficient at lashing is always welcome, right?
Good additional tips
Practice
Practice makes perfect. We hear this all the time and for a good reason, because it’s true! To get better at isolating you have to isolate, isolate, isolate.
If you can’t get a live model to practice on, start practicing on one layer of fake lash (practice lash) and eventually add up to 3 layers of the fake lash to give yourself an isolation challenge.

Make Sure the Adhesive Is Dry Before Continuing to Apply
All your hard work will amount to nothing if you’re careless enough to not give the adhesive dry when attaching an extension lash. Imagine hours of work wasted (and more work added to your plate), much less a very unhappy client as their lashes stick together or even fall out because you rushed through a job.
Always make 100% sure the adhesive is set before moving on to isolating the next lash.
Try working through attaching lashes in the center lines (see the picture A below) instead of working in one direction (Picture B).
Picture A:

Picture B:

When you work sporadically like in picture A, you’ll be less likely to keep disturbing the extension lashes that are in the drying process.
Don’t Rush Your Progress
Speed is the result of years of practice. No beginner can or should expect to be fast at what they do. On the contrary, if you’re still building on your isolating skills, take your time! You won’t get better at it by rushing. Like the Aesop’s fable says, slow and steady wins the race.
Over time, as you pile on the hours of practice, you will be fast at what you do without even thinking about. Good luck on improving your isolation technique. We hope these tips help you to get to where you want to be.
Tools and Materials to use:
https://ilashstore.com/ilash-gel-pads-for-eyelash-...
https://ilashstore.com/3m-hypoallergenic-micropore...
https://ilashstore.com/3m-clear-surgical-tape/
https://ilashstore.com/vetus-non-magnetic-silver-t...